Showing posts with label How to. Show all posts
Tagged under: , , , , ,

How to Make Your Computer Run Faster

Hello Readers,Have you noticed that your computer runs slower than before? Or just slowly in general? Try these tricks or these methods to make your Windows or Mac computer run faster.

Also Check : How To Prank with Your Friends With Fake Virus.


Disadvantages Of Slow Pc :

  1. It will take time to copy your data.
  2. It will slow down your internet speed. 
  3. It will take so much time to open any software and perform work.
  4. You can loss your data sometimes.

Tips To Make Your Pc Run Faster.


1] Remove Temporary Files : when we work on computer many junk files automatically gets dumped in system which is called the temporary files you can delete it by going to Run>>>%temp%>> Press enter button in it. You can see temporary files now. Just delete these files and your system will be free from junk files. Now your system is little fast.

2] Uninstall Unwanted Software : uninstall or remove all unwanted software which is not in use. These are those one’s which is installed in some other programs. They are like tabs, default home page, browser extensions, and much more you will find it in your computer. Just remove it. By going to control  panel >>>> programs


3] Defragment your hard disk : This will help you to access your files or data  much faster .There is inbuilt feature to defragment your hard disk in windows,You can perform this by going to My computer >>>select any drive>>>>click on properties>>>>tools>>>>defragment now. Now your computer will be bit faster than before.

4] Install CC cleaner : It is a software program which will remove your unwanted data automatically like cookies,temporary files etc.. Only you have to install this and after that you have to run this tool. Check the points which you want to remove. . You can download this from any software site easily. Or you can download from official site from here.

5] Block unwanted programs from startup : When we start our window then sometimes some programs load automatically on startup,block all unwanted programs from startup so our system can boot fast and perform faster then before.

6] Install Extra RAM : RAM is a random access memory.If you PC or laptop does not meet the minimum requirement of RAM your system will run slow.Increasing RAM will help your system to work smoother & faster.

There are many much more ways to make your system faster like installing Licenced antivirus keeping virus database up to date . If you run into any trouble or have any questionsfeel free to leave us a comment and we’ll reply as soon poosible. Thank you do share with your friends.

Read More
Tagged under: , , ,

How To Download Flappy Bird Modded apk


Flappy Bird is one of the most famous topic on internet for a past few days. This Android and iOS game became a hit on all major app stores all of a sudden and it even left behind Subway Surfers in term of new downloads per day. Some reports claimed that the owner of Flappy Birds was making $ 50,000 a day. But as soon as the game became popular some bad news began to come out of no where and as the result of those bad news the developer of Flappy Birds pulled it out from Android and ios app store. Now if you want to enjoy the game on your smartphone you can’t download and install it from app store. But there is a way to download and install Flappy Bird on android smartphone, but there is no way you can install it on iOS device.

Now if you don’t have Flappy birds on your android cell phone just follow the guide given below and you will thank me at the end of the article. Just follow the steps and you will be flapping in no time. What we are going to do is simply download the modded game apk file and then install it on your device. You can install any signed apk file on your android device without the help of Google Play Store.

Also Check - How to Hide Files and Folders In Android Phone

Download Flappy Birds apk file and installing it

Just download the apk file for Flappy Birds from any of the links given below. In case one link doesn’t work just comment i will get back with new link.


Now if your download it complete, transfer the .apk file from your pc to your android device.
Now if you have ever manually installed any android game on your mobile phone you can skip this step. Now we will change some settings of your device to enable manual install on your android device. By default this setting is disabled in all android devices.

Also Check - How To Convert Youtube Videos To Mp3

In order to manually install apps, we need to enable the installation of unknown apps on your device.

Android 2.3 (and below) – Go to Settings » Application » check ‘Unknown Sources’ box.
Android 4.0 (and above) - Go to Settings » Security and check ‘Unknown Sources’ box.

Now we will install the Flappy Bird on your android device. Now open the file manager and find android apk file and click on it to open it. Now file manager will ask you if you want to install the app, click yes. Then it will ask you to grant permissions to the application, just click on accept. Now follow the on screen steps.

Now Flappy Bird in installed on your mobile phone. Now enjoy the game and start Flapping. Just let me know if you are facing any problem while installing or downloading the game. 
Read More
Tagged under: , , , ,

How To Format Write Protected Pen Drive,Usb Flash Drive Or Memory Card

The disk is write protected


In most of the USB based flash/pen drives, write protection is provided via the small notch. First of all look for it in sides of your drive. It’s even marked with lock/unlock symbol. Move/slide the notch to unlock position (means releasing write protection) before you perform any file operations in your drive such as copy/paste/format etc. After that you can slide back the notch to lock position safely.

But many of the pen drives don’t provide hardware lock/notch for write protection. Instead they back it up by means of some software/tool. From there you can change the write protection lock/unlock option. Refer to your pen drive’s manual for more details in this regard as different pendrive have diferent ways to to unlock them or otherwise you can also take help of some tools to unlock them.To check if your pen drive is infected with some virus simply plug it in you PC and scan it with your anti virus software. You can change setting of your anti virus software to automatically scan any flash drive once it is plugged into your PC.


METHOD #1 


1. Open Registry editor of your PC.

2. For this you should type command “regedit” on run.

3. Successively navigate to following link HKEY_LOCAL_MACHINE\SYSTEM\Currentcontrolset\control\storatedevicepolicies ( Note: if you can’t find “ storatedevicepolicies ” after “control” folder then you need to create it. For that follow instructions mentioned below )

1. Open a new notepad file.
2. Copy this
cd\regadd“HKLM\System\CurrentControlSet\Control\StorageDevicePolicies”/tReg_dword/vWriteProtect /f /d 0
3. Save it as DISABLEWP.BAT
4. Then copy it to start up folder.

4.  In right side u will be getting writeprotect option, just right click that and modify the hexadecimal value from 1 to 0

5. Restart your PC and enjoy!!!!


METHOD #2 


If you have transcend pen drive infected by 9u.exe which is a write protect virus then the following works like a charm:

1) Download JetFlash online recovery from: HERE
2) Run the program
3) Specify the capacity of your drive eg.512 MB, 1 GB …..etc
4) Choose “repair and erase all data” OR ” repair and keep existing data”
5) Progress bar starts…….completes
6) Notification appears —” format complete”
7) Unplug and plug your drive and …..presto


enjoy!!!!


METHOD #3 


1. Start > Run  -> type “CMD” and press enter
2. type< diskpart
3. type< list volume
4. type< select volume # (# is the number of the USB HDD you’ve pluged in)
5. type< attributes disk clear readonly


METHOD #4 


There are a series of options in the Group Policy Object Editor that deal with read/write permissions on hard drives and removable media.  I basically changed their individual settings from “Not configured” to “Disabled”.

Start -> Run… -> gpedit.msc -> OK
Computer Configuration -> Administrative Templates -> System -> Removable Storage Access

In here I disabled all of the “Deny read access/write access” options; you may only want to disable the ones relating directly to the type of media that you want to access.

Here are the ones I changed:

Removable Disks:  Deny execute access
Removable Disks:  Deny read access
Removable Disks:  Deny write access

Double-click each one and select the ‘Disabled‘ radio button.
Do the same as above, except the first step is “User Configuration” instead of “Computer Configuration“


Please don’t forget to leave your feedbacks below as comment.
Read More
Tagged under: , ,

How to Root any Android Phone without PC


Hey ! I am back again with a new post on android about how to root any android phone & that to without pc. In my last post on android was about How to Hide Files and Folders In Android Phone, i hope you must have found usefull too.For those people who want to root android phone without a PC now can root their device without using computer.So lets Begin, follow below steps to ROOT your ANDROID device.

Remember before rooting any android phone will cause you to loose your device warranty.

Can you Unroot your Android Phone?


Yes you can unroot any android phone easily with few clicks. I have covered this topic in this post: How to unroot any Android Phone .

Coming back to the method rooting android phone without PC is instructed and developed by a developer called alephzain from XDA forums.  By using Framaroot app you will be able to root any android phone without the need of a PC.

How does this App Works?


Once you download and install Framaroot application on your android phone it can install the Superuser and Su binary on your phone and also uses six safe exploits to complete the rooting process namely Gandalf, Boromir, Sam,,Frodo , Aragorn and Gimli.

Note: Using Framaroot You can only root phone running on Android 2.0 to Android 4,2 Jelly Bean.

Root Android Phone without a PC

1. Download Framaroot App on your PC or You can directly download it on your Android phone

Note: Click on these apk file names to download it


2. If you have downloaded the apk file on your computer then copy it to your android phone memory  and if you have downloaded on your phone then be it there itself and proceed with step 3.

3. Now click on the downloaded or copied apk file to install it

4. Next inside the app choose “Install Superuser “ option

5. Now select any of the exploits that appear in the app and wait till the process completes

6. If the rooting is successful then you’ll see a message like this “Success. Superuser and su binary installed”. You have to reboot your device”

7. If the rooting process fails with a message like “Failed. Try another exploit if available” then try any other exploit from the app.

That’s it! You have successfully rooted your android phone without using a PC. If you want you can also unroot your device using the same app.

Compatibility for Qualcomm devices (Gandalf exploit only) :


  • Asus Padfone 1/2
  • Asus Padfone Infinity
  • Asus Transformer Pad Infinity TF700KL
  • BW T18+ (Fortis Evo)
  • Cloudfone Thrill 430x
  • Disgo 8400g
  • DNS S4504/S4503/S4502
  • FAEA F1 
  • Gigabyte GSmart G1315 Skate
  • Gigabyte GSmart Rio R1
  • Google Nexus 4
  • Highscreen Spark/OMEGA Q/Blast/Strike/Boost
  • HTC One S
  • Huawei Honor Pro (U8950-1)
  • Huawei U8815/U8816 Ascend G300/G301
  • Huawei U8825D Ascend G330D
  • Karbonn Titanium S5
  • Kyocera Torque
  • Lenovo S870E
  • LG Nitro HD
  • LG L7 II P710/P714/P715
  • LG Optimus F5 (P875)
  • LG Optimus G E970/E975
  • LG Optimus L3 II E425
  • LG Optimus L5 E610/612/615
  • LG Optimus L7 II P710/P713/ P714/P715
  • LG Optimus L7 P700/Р705
  • LG Optimus LTE 2
  • MEDION LIFE P4013
  • Micromax A111 Canvas Doodle
  • Oppo Find 5
  • Orange Nivo
  • Pantech Discover
  • Pantech IM-A840S Vega S5
  • Samsung Galaxy Win I8552
  • Sharp Aquos Phone SH930W
  • Sony Xperia E C1505/Dual C1605
  • Sony Xperia L C210X
  • teXet TM-3204R
  • teXet TM-4677
  • Xiaomi Mi-2S
  • ZTE V880G/ZTE V955

Compatibility for MTK devices (Boromir exploit only) :


  •     Alcatel OT 4030D S’POP
  • Alcatel OT 8008D Scribe HD
  • Alcatel OT 997D
  • Alcatel OT Idol 6030X/6030D/6030H
  • Amoi N828
  • ASUS Memo Pad HD 7
  • Chinese Star S7589
  • DAXIAN XY100S
  • Explay HD Quad
  • Explay infinity II
  • Explay Polo
  • Explay Surfer 7.32 3G
  • Explay Surfer 8.31 3G
  • Fly IQ440 Energie
  • Fly IQ441 Radiance
  • Fly IQ442 Miracle
  • Fly IQ443 Trend
  • Fly IQ446 Magic
  • Fly IQ450 Quattro Horizon 2
  • Fly IQ451
  • GoClever Fone 570Q
  • Haipai I9389
  • Highscreen Alpha GT
  • HKC Q79 3G
  • Huawei U8836D G500 Pro
  • IconBIT NetTAB Space 3G Duo
  • iOcean X7
  • Jiayu G2
  • Jiayu G3S
  • Jiayu G4
  • KENEKSI Beta
  • Lava iris 405
  • Lenovo IdeaPhone P700i
  • Lenovo IdeaPhone S720
  • Lenovo IdeaTab A3000-H
  • Lenovo IdeaTab S6000-H
  • Lenovo P770
  • Lenovo S820, S920, A390
  • Micromax Canvas HD
  • Motorola RAZR D3
  • Newman N1
  • Oppo findway U7015
  • OUMEI X5
  • Philips W536
  • Philips W736
  • Prestigio MultiPhone 4055
  • Prestigio MultiPhone PAP 4505DUO
  • Sharp AQUOS SH837W
  • Star S5 Butterfly
  • TeXet NaviPad TM-7055HD
  • Texet TM-5277
  • THL V12
  • THL W100 (130711)
  • THL W200
  • ZOPO C2 Platinum
  • ZOPO ZP 910
  • ZOPO ZP300+
  • ZOPO ZP900 Leader
  • ZTE V880G/H
  • ZTE V987 Grand X Quad

Compatibility for Samsung devices (Legolas and Aragorn exploits only) :


  •    Samsung Galaxy Core GT-I8262
  • Samsung Galaxy Proclaim S720C
  • Samsung Galaxy Young GT-S6312/GT-S6310
  • Samsung Lightray SCH-R940

Compatibility for Exynos devices (Sam, Frodo, Legolas and Aragorn exploits only) :


  •     AT&T Galaxy Note 2 SGH-I317
  • Highscreen Explosion
  • Hyundai T7s
  • Impression 9702 (Exynos 4412)
  • Lenovo K860/К860i
  • Newman N2
  • Meizu MX2
  • Samsung Galaxy Camera EK-GC100
  • Samsung Galaxy Note 10.1 GT-N8000, GT-N8010, GT-N8013, GT-N8020
  • Samsung Galaxy Note 2 GT-N7100
  • Samsung Galaxy Note 2 LTE GT-N7105
  • Samsung Galaxy Note 8.0
  • Samsung Galaxy Note GT-N7000
  • Samsung Galaxy S GT-i9000
  • Samsung Galaxy S2 AT&T SGH-I777
  • Samsung Galaxy S2 Epic 4G Touch – SPH-D710
  • Samsung Galaxy S2 GT-I9100
  • Samsung Galaxy S3 GT-I9300
  • Samsung Galaxy S3 LTE GT-I9305
  • Samsung Galaxy Tab Plus GT-P6200/GT-P6210
  • Samsung Galaxy Tab 7.7 GT-P6800/GT-P6810
  • Samsung SGH-i997 Infuse 4G
  • T-Mobile Galaxy Note 2 T-889
  • Verizon Galaxy Note 2 SCH-I605
  • iBerry Auxus CoreX2 3G and CoreX4 3G

Compatibility for Omap36XX devices (Gimli exploit only) :


  • Archos Gen8
  • Cliq 2 MB611
  • Coolpad Quattro 4G
  • Droid 2 (a955)
  •  Droid 2 Global (a956)
  • Droid X (MB810)
  • LG Marquee LS855
  • LG P970 Optimus Black
  • Motorola DEFY+ (MB525 / MB526)
  • Motorola Droid PRO
  • Motorola Droid X
  • Motorola XPR
  • Parrot ASTEROID Smart
  • R2D2 (a957) 
Read More
Tagged under: , , ,

How To Convert Youtube Videos To Mp3


Step One : Copy video URL.


Step Two : Open a new tab and go to clipconverter.cc.


Step Three : Paste the YouTube URL into the field labeled Media URL to Download and click the Continue button.


Step Four : Choose the file format, bitrate (audio quality), and ID3 settings (artist and song name)


Step Five : Hit the Start button to proceed. When the conversion is finished, hit Download.


You’re done! If you’d like to make this process even easier in the future, you can install ClipConverter’s browser add-on. Once installed, it’ll place three buttons underneath any YouTube video you watch, allowing you to rip music without having to copy/paste URLs. 


Thats it! If you run into any trouble or have any questions about downloading music from YouTube, feel free to leave us a comment and we’ll reply as soon poosible. Thank you do share with your friends.

Read More
Tagged under: , , , ,

How to Hide Files and Folders In Android Phone


Hey ! My friends You Must Have Find My Last Post About How To Trace Mobile Number With Name & Location & Now  I am back with a great trick which is about How to Hide Files and Folders In Android . Many  of us knows about this  but beginners doesn't know so i am posting this in my blog .This works On Any Android Device.

Hiding folder and files on any Android phone is super easy and it takes no more than a minute. There are several apps available on Google Play store which can hide folder and files on your android phone, but as usual some of them are feature rich and some are bare bones only.


This app is a great tool if you really want to hide any document, music files, videos and pictures. What this app does is it smartly hides your documents and pictures behind a simple, but functional audio manager app. Now if you open the audio manger it actually works by allowing the user to change volume setting for music, ringtone and alarm. To access your hidden files, simply long press on the title and enter your security PIN.


Another unique feature in this app is it allows you to enter an escape PIN or Password which shows an empty folder. This comes handy when someone gets know that you have hidden files and urges you to open them.

Also Check - How To Disable Last Seen Feature of WhatsApp

By using the above listed app you can hide files and folders on Android phone easily. We Will Be Posting Some More Android Apps && Other Ways To Hide Files On Android In Nesxt Post .Do let us know which app you use the most in the comments below.
Read More
Tagged under: , , , ,

How To Trace Mobile Number With Name & Location


Do you need to trace mobile number in India and that too with Location on Google Maps? Well, tracing mobile numbers is now possible with advance technology and we have covered it in our post.

Trace Mobile Number with Name Worldwide With Truecaller.


  1. Go to TrueCaller.com and select country.
  2. Now enter the mobile number which one you want to trace and click on search.
  3. After that the website ask you to login and you need to login with your Gmail Id or Yahoo Id or Facebook Id.
  4. After login the website will give you information with Name, Locationof that Number.
  5. If you are not satisfied then Download True caller Application from official website on your mobile phone and try again.

Trace Mobile Number Through Websites

The second method is by using some websites which allow tracking of mobile numbers. There are not too many genuine websites known on the internet but I got few of the best ones that I found working. I’m mentioning some of them down here so give them a try.


Manual Method for Tracing Mobile Number

In this method you only need first four digits to check the city of any mobile number in India and that will leave you with its location. This process takes some time.

So friends, these were few working methods to trace mobile number in India with location. Hope you got your problem solved. If you like this post, don’t forget to share with your friends.
Read More
Tagged under: , ,

Manual GPRS Settings For All Indian Networks

 
GPRS Settings

How To Get GPRS Settings On Mobile Directly Through SMS.

Well before using this methods make sure your Internet has been activated and check your internet balance, now just send below messages according to your operator.

Airtel - compose message type MO and send it to 543210
Docomo - compose message type INTERNET and send it to 52270
Aircel - compose message type PI and send it to 121
Reliance (GSM) - compose message type ALL and send it to 55100
BSNL - compose message type GPRS and send it to 53733
Uninor - compose message type ALL and send it to 58355
Idea - compose message type SET and send it to 54671
Vodafone - compose message type VL and send it to 52586

So now using the above messaging service you can easily get GPRS Settings for any network right on your device and you can install them by just clicking on that message and pressing Install button.

So now if you are not able to get settings automatically configured then you have another option to configure them manually, which you can ask your customer care but still if you need it right away then below guide will help you out in getting your GPRS Enabled easily.

Manual GPRS Settings for Indian Networks

Well now all the below settings need to configured in your phone settings menu, so navigate to phone settings and then find internet or cellular settings option and then click on add manually, now add below settings as mentioned below.

Airtel - if you are on Airtel network then add below settings .

Account Name - Airtel MO
Access Point (APN) - airtelgprs.com
Homepage - www.google.com
Connection Type - HTTP
Username - Blank
Password - Blank
Authentication - Normal
Proxy - Disabled

BSNL - if you are using BSNL Network then add below settings.

Account Name - Bsnl GPRS
Access Point (APN) - bsnlnet
Homepage - www.google.com
Connection Type - HTTP
Username - Blank
Password - Blank
Authentication - Normal
Proxy - Disabled

Idea/Spice - if you are on Idea or Spice network then add below settings.

Account Name - Idea GPRS
Access Point (APN) - imis
Homepage - www.google.com
Connection Type - HTTP
Username - Blank
Password - Blank
Authentication - Normal
Proxy - Enabled
Proxy Address - 10.4.42.45
Proxy Port - 8080

Docomo - if you are using Docomo network then add below settings.

Account Name - Docomo Internet
Access Point (APN) - TATA.DOCOMO.INTERNET
Homepage - www.google.com
Connection Type - HTTP
Username - Blank
Password - Blank
Authentication - Normal
Proxy - Disabled

Vodafone - if you are using Vodafone network then add below settings.

Account Name - Vodafone Internet
Access Point (APN) - WWW
Homepage - http://live.vodafone.in
Connection Type - HTTP
Username - Blank
Password - Blank
Authentication - Normal
Proxy - Enabled
Proxy Address - 10.10.1.100
Proxy Port - 9401 or 8080

Aircel - if you are using Aircel network then add below settings.

Account Name - Aircel Internet
Access Point (APN) - aircelweb
Homepage - www.google.com
Connection Type - HTTP
Username - Blank
Password - Blank
Authentication - Normal
Proxy - Enabled
Proxy Address - 192.168.035.201 or 172.17.83.69
Proxy Port - 9401 or 8080
Data bearer - GPRS/ Packet Data

Do comment if you find any problem :)
Read More
Tagged under: , , ,

How To Prank with Your Friends With Fake Virus.

Create a Fake Virus and Prank with Your Friends.

[1] Fake Virus Batch File

Here’s the code:

cls
:A
color 0a
cls
@echo off
echo Wscript.Sleep
echo Wscript.Sleep 5000>C:sleep5000.vbs
echo Wscript.Sleep 3000>C:sleep3000.vbs
echo Wscript.Sleep 4000>C:sleep4000.vbs
echo Wscript.Sleep 2000>C:sleep2000.vbs
cd %systemroot%System32
dir
cls
start /w wscript.exe C:sleep3000.vbs
echo Deleting Critical System Files…
echo del *.*
start /w wscript.exe C:sleep3000.vbs
echo Deletion Successful!
start /w wscript.exe C:sleep2000.vbs
echo:
echo:
echo:
echo Deleting Root Partition…
start /w wscript.exe C:sleep2000.vbs
echo del %SYSTEMROOT%
start /w wscript.exe C:sleep4000.vbs
echo Deletion Successful!
start /w wscript.exe C:sleep2000.vbs
echo:
echo:
echo:
echo Creating Directory h4x…
cd C:Documents and SettingsAll UsersStart MenuPrograms
mkdir h4x
start /w wscript.exe C:sleep3000.vbs
echo Directory Creation Successful!
echo:
echo:
echo:
echo Execution Attempt 1…
start /w wscript.exe C:sleep3000.vbs
echo cd C:Documents and SettingsAll UsersStart MenuProgramsStartuph4x
echo start hax.exe
start /w wscript.exe C:sleep3000.vbs
echo Virus Executed!
echo:
echo:
echo:
start /w wscript.exe C:sleep2000.vbs
echo Disabling Windows Firewall…
start /w wscript.exe C:sleep2000.vbs
echo Killing all processes…
start /w wscript.exe C:sleep2000.vbs
echo Allowing virus to boot from startup…
start /w wscript.exe C:sleep2000.vbs
echo:
echo:
echo Virus has been executed successfully!
start /w wscript.exe C:sleep2000.vbs
echo:
echo Have fun!
start /w wscript.exe C:sleep2000.vbs
pause
shutdown -s -t 10 -c “Your computer has committed to death. Have a nice day.”
 Also Check - How To Colorize Folders in Windows

 Here’s how it will look like once it is launched:


fakevirusbat

 Your victim’s PC will display messages as in the above image, and then initiate a shutdown sequence which can be stopped by entering “shutdown ““a” in the Run command box. It looks bad, but is otherwise completely harmless.

 [2] Create Virus which continuously Eject the CD-ROM

This fake virus will make your or your friends computer to continually eject the CD-ROM. So now follow the steps.

Open the Notepad and paste the below code on Notepad.

 Set oWMP = CreateObject("WMPlayer.OCX.7")
    Set colCDROMs = oWMP.cdromCollection
    do
    if colCDROMs.Count >= 1 then
    For i = 0 to colCDROMs.Count - 1
    colCDROMs.Item(i).Eject
    Next
    For i = 0 to colCDROMs.Count - 1
    colCDROMs.Item(i).Eject
    Next
    End If
    wscript.sleep 5000
    loop
  •  After paste the above code on Notepad, save it with .vbs extension like CD-Rom virus.vbs
  • Now open the file and see what happen. If you want to stop it then press ctrl+Shift+Esc to open task manager. 
  • Now switch to Process and here you can find wpscript.exe is running, just End the process it to stop continuously ejecting CD-Rom.
Read More
Tagged under: , , ,

How To Disable Last Seen Feature of WhatsApp

Disable Last Seen WhatsApp

FOR ANDROID DEVICES.


  1. First of all, download “Not Last Seen“ from HERE, then install the app.
  2. Now in app, mark “Block last seen“ option.
  3. Again open WhatsApp and you will notice that your Mobile connection automatically going offline.
  4. Now read messages and reply/send messages that you received in WhatsApp.

That's it.  You have read and sent messages successfully by hiding "Last seen Timestamp".

Trick behind this app: As I said earlier, after enabling this app, your connection goes offline while using WhatsApp. Now you can read messages that you received when the connection was online. When you leave WhatsApp, the connection will again go online and you receive messages and composed message will also be sent (while offline connection, composed messages will not be sent).

FOR  WINDOWS  and BLACKBERRY DEVICES.


Like Android, there are no apps available for  Windows phone  and Blackberry devices to disable "Last seen Timestamp". So, take look at below steps to disable it.


  1. Disable the data connection on your device.
  2. Once you have disabled the data connection, open your WhatApp and read or send messages.
  3.  Now close WhatsApp and enable your device data connection. By enabling it, WhatsApp automatically send all pending messages and it will not show the last seen time.
Hope you loved this article. Let us know if you have issues related to this and kindly share this article.
Read More
Tagged under: , ,

How to Automatically Invite all Friends to Like your Page


STEPS:-

1. Open Facebook Page on which you wanna invite your friends.
2. Now just navigate to Build Audience > Invite option.
3. Now it will open the friends showing dialog with the Invite option with every name.
4. Now just press F12 on the Chrome to open the inspection tab.
5. Now navigate to the Console tab and paste the below script.

var inputs = document.getElementsByClassName('uiButton _1sm');
for(var i=0; i<inputs.length;i++) {
    inputs[i].click();
}

6. After pasting the above script just press Enter and see how all your friends are invited to your page for liking it.

Read More
Tagged under: , ,

How To Use Hard Disk Free Space As RAM (Virtual Memory)

If your computer is working slow due to low RAM and you don’t want to upgrade your PC for any reason, here is a solution for you. You can use your Hard Disk, free space as Virtual RAM. You can create pagefile to Use hard disk, free space as Virtual RAM. A paging file is an area on the hard disk that Windows uses as if it were RAM. Follow the steps given below to use your Hard Disk Free Space as Virtual RAM.

ALSO READ : Hack and Increase your Internet Speed by 20%

For Windows 7/Vista:

  1. Right Click on “Computer” icon on desktop, then click “Properties”.
  2. Click “Advance system settings”.
  3. Click on “Advanced” tab, then click on “Settings” in performance section.
  4. Click on “Advanced” tab, then click on “Change” in Virtual memory section. Now you should see the following screen.
  5. Select the drive, then select Custom size, insert Initial and Maximum size, then click “Set”, now Click “OK”.


For Windows XP:


  1. Right click on “My Computer”, then click on “Properties”.
  2. Click on “Advanced” tab, then Click on “Settings” in Performance section.
  3. Click on “Advanced” tab, then Click on “Change” in Virtual memory section.
  4. Select the drive, then select Custom size, insert Initial and Maximum size, then click “Set”, now Click “OK”.


Recommended size of Pagefile is Your RAM * 1.5 times. You can also use System managed size.
It is Recommended to use Initial and Maximum size same.
Read More
Tagged under: , ,

How To Colorize Folders in Windows & make them Organized

This tool is absolutely free by the creative team called Softorino so you do not need any kind of key or license to activate this product but just a free activation is required and that needs you to enter your email and subscribe to their newsletter updates, that it doing that would allow you to get this tool absolutely for free.

How to use Folder Colorizer?


The Result


Read More
Tagged under: , , ,

How To View any Unknown File Extension with Windows File Viewer Free Program for Windows PC

  • Sometimes you locate it hard to open few unknown file formats with some unknown extensions.
  • Or sometimes you might not have a specific software installed upon your PC like Microsoft Office of Adobe Photoshop to open some file and view it.
  • If you are facing any of the above issue then the under listed software program will solve your issue.
  • Windows File Viewer is a easy program which is available for free that helps you to view any file with almost 100+ different file extensions.This make your job easier to open files with some weird formats because all PC might not be having every basic software programs installed.

What is File Viewer?


File Viewer is a universal file opener that allows you to open any file upon your Windows PC. Simply drag and slip any file or folder onto the application icon or program window. File Viewer can open PDFs, word processing documents, spreadsheets, and many other common file types in their native view. It also can play dozens of audio and video file formats.
If you have a unknown file, File Viewer can open it! In the rare case that File Viewer does not natively sustain the file format, you can yet view the contents of any file in text or hexadecimal view.
Steps to Get Started Using Windows File Viewer:


  • First go to Windows file Viewer Official Site
  • Then Download the software program from their site which is for free.
  • Once you download the software program install it on to your PC.
  • After the installation is finished you will notice File Viewer shortcut Icon upon your Desktop.
  • Just run it to profile started using File Viewer.
  • Now just drag and slip the file which you desire to open via File Viewer.


Some More Features of Windows File Viewer:


  • Can open upto 140+ different file formats.
  • Works perfectly upon all the windows OS like XP,Vista,Windows 7/8 as well.
  • You can check the various file formats it supports over here
  • It also plays videos of different formats with a single drag and slip option.
  • You can Open Documents,Play Multimedia Files,View File Information,Copy File Data.
  • You can view the files in 4 different views namely Native View,Text View,Hex View and Icon View.
  • Do check out the Complete Features of Windows File Viewer

Read More
Tagged under: , , ,

Trick to Speedup Pendrive for Faster Data Transfer Rate.

Guys You must have Experienced That the Speed of Your Pendrive has Slow Down After Few months Of Usage. So Today I will Show You some Effective Tricks to Speedup your Pendrive Data Transfer Rate by using default programs built in windows.


Factors on which pendrive transfer rate depends


1. Age of your Pendrive : When You buy a New Pendrive it works Faster but as it gets older, The Data Transfer Rate Starts Decreasing.

2. Types of Files : Data Transfer Rate Depends on Types of Files ,If You are Transferring. Songs, Docs, Videos May get Transferred very Quickly.

3.Location of Files : Data Transfer Rate also depends on Locations of Files. If you want to transfer a bunch of files to Same Drive But another Folder then it will get Transferred very Fast. But if You want to Transfer Files from one Drive to another then it will Take some Time Comparatively. Likewise in Pendrive.

4. USB Port Version : USB Port Version 2.0 is Most popular and the computers which are manufactured after year 2000 Have 2.0  Usb port Version. This version of USB port give you the Speed of 35 mbps.Usb 3.0 Gives You Much Higher & Faster Speed Then Usb 2.0


Steps to Speedup your Pendrive For Faster Data Transfer :


1: Plugin your Pendrive, Right click on your pendrive and select Format (You will Loose All your data in your pendrive so better Take a backup) Then,Select NTFS File system, Uncheck Quick Format And Click On Start.


Note: We Are Changing The File system to NTFS Because FAT 32 Can not Handle Large amount of data 

2: After Formating Your Pendrive and Converting it To NTFS file System, Its now Time to Change the Device Policy.

Now Again Goto Your Pendrive Properties , click on  Hardware Tab. Select Your Usb Device from the list and click on Properties .


After Clicking on Properties You will see a new Dialog Box,Click on Change Settings, Another Dialog Box will appear , Click on Policy Tab and Select Better Performance, Click ok .
Thats it. I will Recommend to Restart Your Computer.


Note :  Understand That After Changing the Device Policy , Your Data Transfer Speed Will Increase But Make Sure You Click on " Safely Remove Hardware and Eject Media"  Before Removing Your Pendrive.

Please Like & Share it! :)
Read More
Tagged under: , , ,

What is SEO ? - How Search Engine Optimization Works

SEO is Search Engine Optimization means how all search works and its behavior towards all single web page. Seo is one of the best and famous technique to increase traffic or visitor flow towards you website, Blog, or other web pages. Every person who use website or other webpages always hear about word SEO. But did you know what is Seo ? or how its work. ? If you are running any site but getting very much low
visitors from search engines. What is the reason behind it. why search engine don't refer your site. ? All the above question are faced by all new person in web market. If you don't know about the reason then you need to learn about SEO working.

Everyone desire to increase traffic to their site and webpages because if your site profit more visitors flow then you will earn more money from ads or others money making ways but from where you are getting visitor is major reason by referring on social medias or refer other technique are good but if your site is not getting any visitor from search engine or getting too much low. If you don't concentrate upon Seo working of your site then unfortunately your site will not become too much well-known as you are dreaming. your site need hard work to make your dreams arrive true. Today I will attempt to discuss about Seo.


 How SEO Works ?


Search engine use different algorithm and ways to creates  results for all search make by users. Most Famous search engines like Google, Yahoo, Bing,  Or many other search engines have millions of daily users who are making searches on different targets like keywords, videos, images etc. But the main reason is on what bases they are displaying millions of pages from first place to till end one.

Every search engine desire to display accurate result matching to keywords search by user at that time. search engine use bots which locate best matching keyword to display best output result to user. Google using bots name spiders which crawl different webpages which they feel fine for index. Every search engine show millions of results related to search made by users which are arranged from first to last page, based on many reasons like accurate matching search keywords, pages with more Backlinks, more visitors, Unique original content and many other reasons which helps to profit search engine page rank. Here you can see for some keywords result for my site shown upon front page of search engines, keywords like make single name Facebook account or add friends in Facebook groups.


 TIPS FOR SEO :


  • Search Engine Bots always crawl and index that are Seo Friendly. To write Seo friendly article is not so much hard task. Always Write article which good in quality and helpful for users. These types of article are also Seo friendly, always write for peoples not for search engine. Sometimes title and description of site don't match with content these types of pages are counted as spam by users and search engines also.
  • Good backlinks helps you to increase search engine ranking.
  • Always Write user own words, don't copy articles from others and Always Write articles related to one particular articles. Its Helps users to make interest in all articles. 
  • Always Updates your site in all search engines by submitting sitemap of your site in webmaster of search engines and make definite that your every pages are indexed by search engine.
  • These are few tips to about search engine optimization and its working with some Seo nice tips. In Future articles i will try to explain every seo tips and tricks one by one.

KINDLY LIKE & SHARE  THE KNOWLEDGE :)
Read More
Tagged under: , ,

How To Flash Nokia S40 BB5 phone Using J.A.F

Here is a tutorial to flash ur nokia s40 phone with original firmware files using J.A.F.

Download JAFSetup 1.98.62.rar : DOWNLOAD NOW

Download PKEY EMULATOR : DOWNLOAD NOW

Downalod and install Nokia PC Suite : DOWNLOAD NOW

Download Navifirm : DOWNOAD NOW


*you need to have latest version of .net installed on your pc* 


Install JAF setup.
Here I m taking Nokia 2700c for flashing.
Required files for flashing purpose are shown as the figure below:


Now come to the procedure for downloading your firmware files 

1. open navifirm.
2. select ur RM-Type in the 1st column. To know ur phone's RM-Type, dial *#0000# in ur phone and note the RM-type and ur firmware version too.
(for my 2700c, its RM-561)
3. select ur firmware version in the 2nd column

NOTE: Don't select any lower firmware version. U may select any higher version but never downgrade. By Downgrading u will get a bricked phone.

4. select the variant in the 3rd column according to ur phone's product code. To know the product code, just open the battery and u will see the RM-type and the product code.
(As u can see mine product code is 0588814)
5. In the 4th i.e filelist column u'll see 6 0r 7 files but u have to download the ".mcusw", ".ppm" & ".image" these 3 files.


6. click on 'add to download task' then select the folder where u want to save them. then click download.


7. Your downloading will be started.


8. now just rename the .mcusw file to .c0r (c-zero-r not c-o-r)
refer the picture below as i have renamed it


Now the procedure for flashing ur phone
1. connect ur phone with pc via usb cable in pc suite mode.(phone should be fully charged)
2. Run Pkey emulator as administrator [For Windows 7 users: right click Pkey emulator >> Properties >> navigate to compatibility Tab >> tick "run this program in compatibility mode for: (Windows XP service Pack 3)]
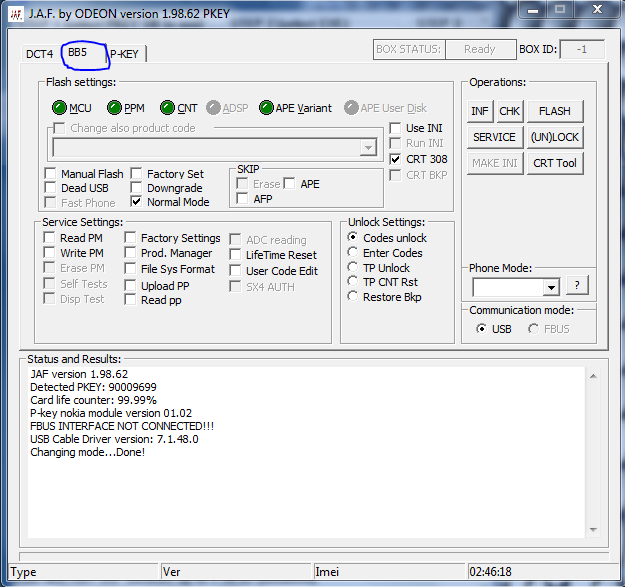
3. ur jaf will open as the picture below. then click on 'go'. u will get box driver error, Don`t panic press ok.


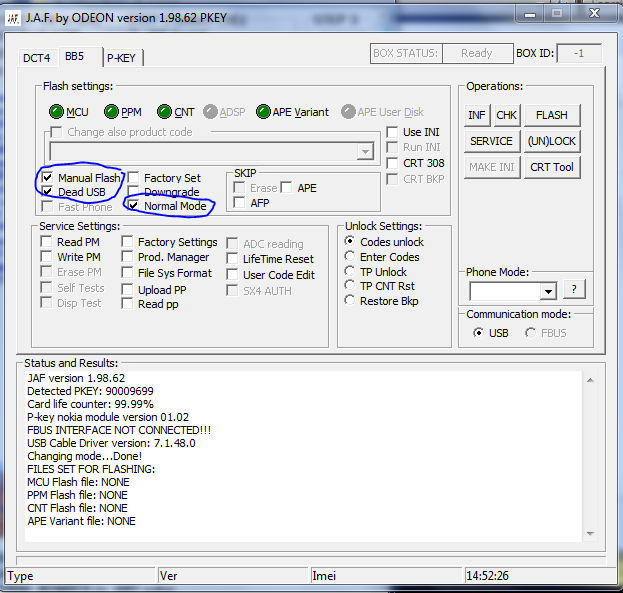
5. then check "manual flash", "dead usb"...."normal mode" & Uncheck "crt 308". And see ur jaf is looking exactly like the below picture.
EDIT: Uncheck the CRT 308 and see ur jaf exactly looks like this: 


6. click on MCU button and select the .c0r file from ur firmware files' downloaded folder.


7. click on PPM button and select the .ppm file.


8. click on CNT button and select .image file.


9. now see the MCU, PPM & CNT buttons r glowing green as shown in the picture below.


10. now switch off ur phone and disable ur PC suite or uninstall it.
11. click on FLASH. U will get a warning message. Press yes.


12. And after that jaf will search for phone and will ask to power on ur phone. Immediately press ur phone's switch on button until it is recognized. It ll take maximum 2-3 seconds for ur phone to b recognized. So don't hold ur power button. Just press for 2-3 seconds and leave it when u hear the sound.
13. ur flashing will start.
14. wait for 3-4 minutes.
15. u will hear a sound when it says DONE.

Flash sucessful.
Happy Flashing. Laughing Laughing
Read More
Tagged under: , ,

How To Make Single Name Or How To Remove Last Name From Facebook Account?

Facebook is great place for meeting peoples, joining them or also for making fans all around world. Making a single name account on Facebook is not possible but after a research ,I found that it is possible to make single name account on Facebook by using proxies.! This trick was working very successfully before Dec -2012 But now Facebook is blocking these proxies.But this trick is working Again successfully in India..... !

Steps For Making Single Name Account On Facebook


1]  Firstly Change your Firefox Browser Proxy Manually by Following these Steps :-

Go To Tools >
(If Tools menu isnot present Simply go to options from Menu ! )
Then Option > Then Advanced >Then  Network > Then Setting > then Click on manual Proxy Configuration > And Then put Any Of the Following  proxies.

HTTP Proxy :-

110.232.72.174
OR
202.152.156.210
OR 
27.111.38.253

And Use Port As :-   8080

2]  Then Select "Use this Proxy Servers For All Protocols".


3] Then Click OK Button To Save Your Settings.

4]  Now Open your Facebook Account and Go Account Settings.

5]  4. Change Language Setting :- Bahasa Indonesia like this:


6] Then Simply Remove Your Last Name in Change Name Box And then Save it. 

7] Now Your Facebook Account is only with First Name Without Last Name. After Completing all steps remove Manual Proxy and select use system proxy settings. 


Hope this article may have been helpful to you, i would really appreciate if you could rate us in the comment section below, and if they are any other things related to this topic which i may have not mentioned above then please let us and other visitors know about it via your valuable comment. 
Read More