Showing posts with label windows. Show all posts
Tagged under: , , , , ,

How to Make Your Computer Run Faster

Hello Readers,Have you noticed that your computer runs slower than before? Or just slowly in general? Try these tricks or these methods to make your Windows or Mac computer run faster.

Also Check : How To Prank with Your Friends With Fake Virus.


Disadvantages Of Slow Pc :

  1. It will take time to copy your data.
  2. It will slow down your internet speed. 
  3. It will take so much time to open any software and perform work.
  4. You can loss your data sometimes.

Tips To Make Your Pc Run Faster.


1] Remove Temporary Files : when we work on computer many junk files automatically gets dumped in system which is called the temporary files you can delete it by going to Run>>>%temp%>> Press enter button in it. You can see temporary files now. Just delete these files and your system will be free from junk files. Now your system is little fast.

2] Uninstall Unwanted Software : uninstall or remove all unwanted software which is not in use. These are those one’s which is installed in some other programs. They are like tabs, default home page, browser extensions, and much more you will find it in your computer. Just remove it. By going to control  panel >>>> programs


3] Defragment your hard disk : This will help you to access your files or data  much faster .There is inbuilt feature to defragment your hard disk in windows,You can perform this by going to My computer >>>select any drive>>>>click on properties>>>>tools>>>>defragment now. Now your computer will be bit faster than before.

4] Install CC cleaner : It is a software program which will remove your unwanted data automatically like cookies,temporary files etc.. Only you have to install this and after that you have to run this tool. Check the points which you want to remove. . You can download this from any software site easily. Or you can download from official site from here.

5] Block unwanted programs from startup : When we start our window then sometimes some programs load automatically on startup,block all unwanted programs from startup so our system can boot fast and perform faster then before.

6] Install Extra RAM : RAM is a random access memory.If you PC or laptop does not meet the minimum requirement of RAM your system will run slow.Increasing RAM will help your system to work smoother & faster.

There are many much more ways to make your system faster like installing Licenced antivirus keeping virus database up to date . If you run into any trouble or have any questionsfeel free to leave us a comment and we’ll reply as soon poosible. Thank you do share with your friends.

Read More
Tagged under: , , , ,

How To Format Write Protected Pen Drive,Usb Flash Drive Or Memory Card

The disk is write protected


In most of the USB based flash/pen drives, write protection is provided via the small notch. First of all look for it in sides of your drive. It’s even marked with lock/unlock symbol. Move/slide the notch to unlock position (means releasing write protection) before you perform any file operations in your drive such as copy/paste/format etc. After that you can slide back the notch to lock position safely.

But many of the pen drives don’t provide hardware lock/notch for write protection. Instead they back it up by means of some software/tool. From there you can change the write protection lock/unlock option. Refer to your pen drive’s manual for more details in this regard as different pendrive have diferent ways to to unlock them or otherwise you can also take help of some tools to unlock them.To check if your pen drive is infected with some virus simply plug it in you PC and scan it with your anti virus software. You can change setting of your anti virus software to automatically scan any flash drive once it is plugged into your PC.


METHOD #1 


1. Open Registry editor of your PC.

2. For this you should type command “regedit” on run.

3. Successively navigate to following link HKEY_LOCAL_MACHINE\SYSTEM\Currentcontrolset\control\storatedevicepolicies ( Note: if you can’t find “ storatedevicepolicies ” after “control” folder then you need to create it. For that follow instructions mentioned below )

1. Open a new notepad file.
2. Copy this
cd\regadd“HKLM\System\CurrentControlSet\Control\StorageDevicePolicies”/tReg_dword/vWriteProtect /f /d 0
3. Save it as DISABLEWP.BAT
4. Then copy it to start up folder.

4.  In right side u will be getting writeprotect option, just right click that and modify the hexadecimal value from 1 to 0

5. Restart your PC and enjoy!!!!


METHOD #2 


If you have transcend pen drive infected by 9u.exe which is a write protect virus then the following works like a charm:

1) Download JetFlash online recovery from: HERE
2) Run the program
3) Specify the capacity of your drive eg.512 MB, 1 GB …..etc
4) Choose “repair and erase all data” OR ” repair and keep existing data”
5) Progress bar starts…….completes
6) Notification appears —” format complete”
7) Unplug and plug your drive and …..presto


enjoy!!!!


METHOD #3 


1. Start > Run  -> type “CMD” and press enter
2. type< diskpart
3. type< list volume
4. type< select volume # (# is the number of the USB HDD you’ve pluged in)
5. type< attributes disk clear readonly


METHOD #4 


There are a series of options in the Group Policy Object Editor that deal with read/write permissions on hard drives and removable media.  I basically changed their individual settings from “Not configured” to “Disabled”.

Start -> Run… -> gpedit.msc -> OK
Computer Configuration -> Administrative Templates -> System -> Removable Storage Access

In here I disabled all of the “Deny read access/write access” options; you may only want to disable the ones relating directly to the type of media that you want to access.

Here are the ones I changed:

Removable Disks:  Deny execute access
Removable Disks:  Deny read access
Removable Disks:  Deny write access

Double-click each one and select the ‘Disabled‘ radio button.
Do the same as above, except the first step is “User Configuration” instead of “Computer Configuration“


Please don’t forget to leave your feedbacks below as comment.
Read More
Tagged under: , , ,

How To Prank with Your Friends With Fake Virus.

Create a Fake Virus and Prank with Your Friends.

[1] Fake Virus Batch File

Here’s the code:

cls
:A
color 0a
cls
@echo off
echo Wscript.Sleep
echo Wscript.Sleep 5000>C:sleep5000.vbs
echo Wscript.Sleep 3000>C:sleep3000.vbs
echo Wscript.Sleep 4000>C:sleep4000.vbs
echo Wscript.Sleep 2000>C:sleep2000.vbs
cd %systemroot%System32
dir
cls
start /w wscript.exe C:sleep3000.vbs
echo Deleting Critical System Files…
echo del *.*
start /w wscript.exe C:sleep3000.vbs
echo Deletion Successful!
start /w wscript.exe C:sleep2000.vbs
echo:
echo:
echo:
echo Deleting Root Partition…
start /w wscript.exe C:sleep2000.vbs
echo del %SYSTEMROOT%
start /w wscript.exe C:sleep4000.vbs
echo Deletion Successful!
start /w wscript.exe C:sleep2000.vbs
echo:
echo:
echo:
echo Creating Directory h4x…
cd C:Documents and SettingsAll UsersStart MenuPrograms
mkdir h4x
start /w wscript.exe C:sleep3000.vbs
echo Directory Creation Successful!
echo:
echo:
echo:
echo Execution Attempt 1…
start /w wscript.exe C:sleep3000.vbs
echo cd C:Documents and SettingsAll UsersStart MenuProgramsStartuph4x
echo start hax.exe
start /w wscript.exe C:sleep3000.vbs
echo Virus Executed!
echo:
echo:
echo:
start /w wscript.exe C:sleep2000.vbs
echo Disabling Windows Firewall…
start /w wscript.exe C:sleep2000.vbs
echo Killing all processes…
start /w wscript.exe C:sleep2000.vbs
echo Allowing virus to boot from startup…
start /w wscript.exe C:sleep2000.vbs
echo:
echo:
echo Virus has been executed successfully!
start /w wscript.exe C:sleep2000.vbs
echo:
echo Have fun!
start /w wscript.exe C:sleep2000.vbs
pause
shutdown -s -t 10 -c “Your computer has committed to death. Have a nice day.”
 Also Check - How To Colorize Folders in Windows

 Here’s how it will look like once it is launched:


fakevirusbat

 Your victim’s PC will display messages as in the above image, and then initiate a shutdown sequence which can be stopped by entering “shutdown ““a” in the Run command box. It looks bad, but is otherwise completely harmless.

 [2] Create Virus which continuously Eject the CD-ROM

This fake virus will make your or your friends computer to continually eject the CD-ROM. So now follow the steps.

Open the Notepad and paste the below code on Notepad.

 Set oWMP = CreateObject("WMPlayer.OCX.7")
    Set colCDROMs = oWMP.cdromCollection
    do
    if colCDROMs.Count >= 1 then
    For i = 0 to colCDROMs.Count - 1
    colCDROMs.Item(i).Eject
    Next
    For i = 0 to colCDROMs.Count - 1
    colCDROMs.Item(i).Eject
    Next
    End If
    wscript.sleep 5000
    loop
  •  After paste the above code on Notepad, save it with .vbs extension like CD-Rom virus.vbs
  • Now open the file and see what happen. If you want to stop it then press ctrl+Shift+Esc to open task manager. 
  • Now switch to Process and here you can find wpscript.exe is running, just End the process it to stop continuously ejecting CD-Rom.
Read More
Tagged under: , ,

How To Use Hard Disk Free Space As RAM (Virtual Memory)

If your computer is working slow due to low RAM and you don’t want to upgrade your PC for any reason, here is a solution for you. You can use your Hard Disk, free space as Virtual RAM. You can create pagefile to Use hard disk, free space as Virtual RAM. A paging file is an area on the hard disk that Windows uses as if it were RAM. Follow the steps given below to use your Hard Disk Free Space as Virtual RAM.

ALSO READ : Hack and Increase your Internet Speed by 20%

For Windows 7/Vista:

  1. Right Click on “Computer” icon on desktop, then click “Properties”.
  2. Click “Advance system settings”.
  3. Click on “Advanced” tab, then click on “Settings” in performance section.
  4. Click on “Advanced” tab, then click on “Change” in Virtual memory section. Now you should see the following screen.
  5. Select the drive, then select Custom size, insert Initial and Maximum size, then click “Set”, now Click “OK”.


For Windows XP:


  1. Right click on “My Computer”, then click on “Properties”.
  2. Click on “Advanced” tab, then Click on “Settings” in Performance section.
  3. Click on “Advanced” tab, then Click on “Change” in Virtual memory section.
  4. Select the drive, then select Custom size, insert Initial and Maximum size, then click “Set”, now Click “OK”.


Recommended size of Pagefile is Your RAM * 1.5 times. You can also use System managed size.
It is Recommended to use Initial and Maximum size same.
Read More
Tagged under: , ,

How To Colorize Folders in Windows & make them Organized

This tool is absolutely free by the creative team called Softorino so you do not need any kind of key or license to activate this product but just a free activation is required and that needs you to enter your email and subscribe to their newsletter updates, that it doing that would allow you to get this tool absolutely for free.

How to use Folder Colorizer?


The Result


Read More
Tagged under: , , ,

How To View any Unknown File Extension with Windows File Viewer Free Program for Windows PC

  • Sometimes you locate it hard to open few unknown file formats with some unknown extensions.
  • Or sometimes you might not have a specific software installed upon your PC like Microsoft Office of Adobe Photoshop to open some file and view it.
  • If you are facing any of the above issue then the under listed software program will solve your issue.
  • Windows File Viewer is a easy program which is available for free that helps you to view any file with almost 100+ different file extensions.This make your job easier to open files with some weird formats because all PC might not be having every basic software programs installed.

What is File Viewer?


File Viewer is a universal file opener that allows you to open any file upon your Windows PC. Simply drag and slip any file or folder onto the application icon or program window. File Viewer can open PDFs, word processing documents, spreadsheets, and many other common file types in their native view. It also can play dozens of audio and video file formats.
If you have a unknown file, File Viewer can open it! In the rare case that File Viewer does not natively sustain the file format, you can yet view the contents of any file in text or hexadecimal view.
Steps to Get Started Using Windows File Viewer:


  • First go to Windows file Viewer Official Site
  • Then Download the software program from their site which is for free.
  • Once you download the software program install it on to your PC.
  • After the installation is finished you will notice File Viewer shortcut Icon upon your Desktop.
  • Just run it to profile started using File Viewer.
  • Now just drag and slip the file which you desire to open via File Viewer.


Some More Features of Windows File Viewer:


  • Can open upto 140+ different file formats.
  • Works perfectly upon all the windows OS like XP,Vista,Windows 7/8 as well.
  • You can check the various file formats it supports over here
  • It also plays videos of different formats with a single drag and slip option.
  • You can Open Documents,Play Multimedia Files,View File Information,Copy File Data.
  • You can view the files in 4 different views namely Native View,Text View,Hex View and Icon View.
  • Do check out the Complete Features of Windows File Viewer

Read More
Tagged under: , , ,

Trick to Speedup Pendrive for Faster Data Transfer Rate.

Guys You must have Experienced That the Speed of Your Pendrive has Slow Down After Few months Of Usage. So Today I will Show You some Effective Tricks to Speedup your Pendrive Data Transfer Rate by using default programs built in windows.


Factors on which pendrive transfer rate depends


1. Age of your Pendrive : When You buy a New Pendrive it works Faster but as it gets older, The Data Transfer Rate Starts Decreasing.

2. Types of Files : Data Transfer Rate Depends on Types of Files ,If You are Transferring. Songs, Docs, Videos May get Transferred very Quickly.

3.Location of Files : Data Transfer Rate also depends on Locations of Files. If you want to transfer a bunch of files to Same Drive But another Folder then it will get Transferred very Fast. But if You want to Transfer Files from one Drive to another then it will Take some Time Comparatively. Likewise in Pendrive.

4. USB Port Version : USB Port Version 2.0 is Most popular and the computers which are manufactured after year 2000 Have 2.0  Usb port Version. This version of USB port give you the Speed of 35 mbps.Usb 3.0 Gives You Much Higher & Faster Speed Then Usb 2.0


Steps to Speedup your Pendrive For Faster Data Transfer :


1: Plugin your Pendrive, Right click on your pendrive and select Format (You will Loose All your data in your pendrive so better Take a backup) Then,Select NTFS File system, Uncheck Quick Format And Click On Start.


Note: We Are Changing The File system to NTFS Because FAT 32 Can not Handle Large amount of data 

2: After Formating Your Pendrive and Converting it To NTFS file System, Its now Time to Change the Device Policy.

Now Again Goto Your Pendrive Properties , click on  Hardware Tab. Select Your Usb Device from the list and click on Properties .


After Clicking on Properties You will see a new Dialog Box,Click on Change Settings, Another Dialog Box will appear , Click on Policy Tab and Select Better Performance, Click ok .
Thats it. I will Recommend to Restart Your Computer.


Note :  Understand That After Changing the Device Policy , Your Data Transfer Speed Will Increase But Make Sure You Click on " Safely Remove Hardware and Eject Media"  Before Removing Your Pendrive.

Please Like & Share it! :)
Read More
Tagged under: , ,

How to add contacts to WhatsApp on PC ?

In my previous post about "how to run whatsapp on pc" I got many emails  about how to add contacts to whatsapp on pc using bluestack.Many users are facing problems for adding contacts to WhatsApp for PC. So here I'll provide you with short tutorial along with the snapshots, step wise.

ALSO READ : HOW TO MAKE WHATSAPP FREE FOR LIFETIME

FOLLOW BELOW STEPS :

STEP 1 - Click PENCIL like icon.


STEP 2 - Click on 'show menu' button of the BlueStacks App Player as shown in the image.


STEP 3 - Click on 'Contacts'


STEP 4 - Then in contacts, click again the 'show menu' button next to the 'back' button. The screen will show the various option as you can see in the below image.


 Final Step : Simply add the phone number and get in touch with your friends!


KINDLY LIKE & SHARE THE KNOWLEDGE :)
Read More
Tagged under: , ,

How To Flash Nokia S40 BB5 phone Using J.A.F

Here is a tutorial to flash ur nokia s40 phone with original firmware files using J.A.F.

Download JAFSetup 1.98.62.rar : DOWNLOAD NOW

Download PKEY EMULATOR : DOWNLOAD NOW

Downalod and install Nokia PC Suite : DOWNLOAD NOW

Download Navifirm : DOWNOAD NOW


*you need to have latest version of .net installed on your pc* 


Install JAF setup.
Here I m taking Nokia 2700c for flashing.
Required files for flashing purpose are shown as the figure below:


Now come to the procedure for downloading your firmware files 

1. open navifirm.
2. select ur RM-Type in the 1st column. To know ur phone's RM-Type, dial *#0000# in ur phone and note the RM-type and ur firmware version too.
(for my 2700c, its RM-561)
3. select ur firmware version in the 2nd column

NOTE: Don't select any lower firmware version. U may select any higher version but never downgrade. By Downgrading u will get a bricked phone.

4. select the variant in the 3rd column according to ur phone's product code. To know the product code, just open the battery and u will see the RM-type and the product code.
(As u can see mine product code is 0588814)
5. In the 4th i.e filelist column u'll see 6 0r 7 files but u have to download the ".mcusw", ".ppm" & ".image" these 3 files.


6. click on 'add to download task' then select the folder where u want to save them. then click download.


7. Your downloading will be started.


8. now just rename the .mcusw file to .c0r (c-zero-r not c-o-r)
refer the picture below as i have renamed it


Now the procedure for flashing ur phone
1. connect ur phone with pc via usb cable in pc suite mode.(phone should be fully charged)
2. Run Pkey emulator as administrator [For Windows 7 users: right click Pkey emulator >> Properties >> navigate to compatibility Tab >> tick "run this program in compatibility mode for: (Windows XP service Pack 3)]
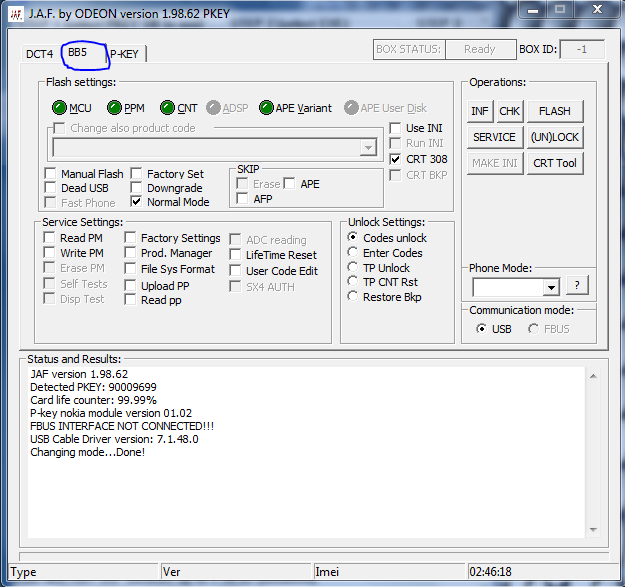
3. ur jaf will open as the picture below. then click on 'go'. u will get box driver error, Don`t panic press ok.


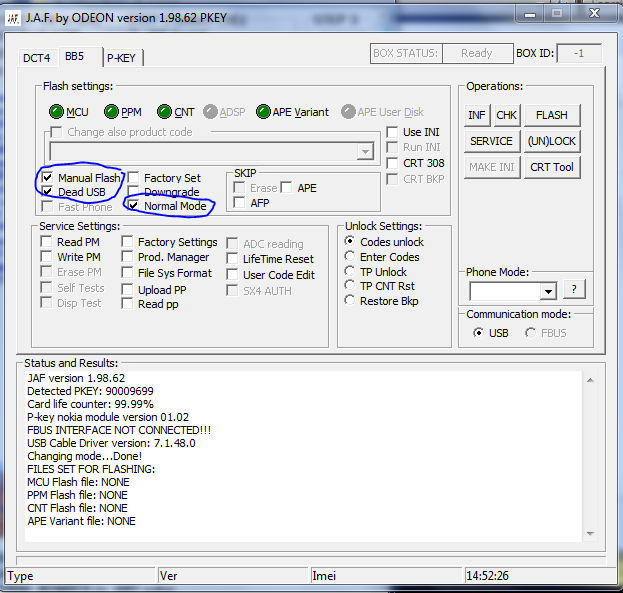
5. then check "manual flash", "dead usb"...."normal mode" & Uncheck "crt 308". And see ur jaf is looking exactly like the below picture.
EDIT: Uncheck the CRT 308 and see ur jaf exactly looks like this: 


6. click on MCU button and select the .c0r file from ur firmware files' downloaded folder.


7. click on PPM button and select the .ppm file.


8. click on CNT button and select .image file.


9. now see the MCU, PPM & CNT buttons r glowing green as shown in the picture below.


10. now switch off ur phone and disable ur PC suite or uninstall it.
11. click on FLASH. U will get a warning message. Press yes.


12. And after that jaf will search for phone and will ask to power on ur phone. Immediately press ur phone's switch on button until it is recognized. It ll take maximum 2-3 seconds for ur phone to b recognized. So don't hold ur power button. Just press for 2-3 seconds and leave it when u hear the sound.
13. ur flashing will start.
14. wait for 3-4 minutes.
15. u will hear a sound when it says DONE.

Flash sucessful.
Happy Flashing. Laughing Laughing
Read More